
Doing home repairs can be a daunting prospect, especially if it’s something you’re not familiar with. But no matter your expertise level, fixing a leak in your basement ceiling is definitely achievable! By following the step-by-step instructions outlined below on how to fix leak in basement ceiling, you can quickly and easily fix the issue – so you don’t have to worry about water damage or mold growth any longer. As always, when working on DIY projects like this one, read through all instructions before beginning and review safety precautions to avoid injury. Now let’s get started on finding that leaky ceiling and plugging it up right away!
Why Is Water Leaking through My Basement Ceiling?
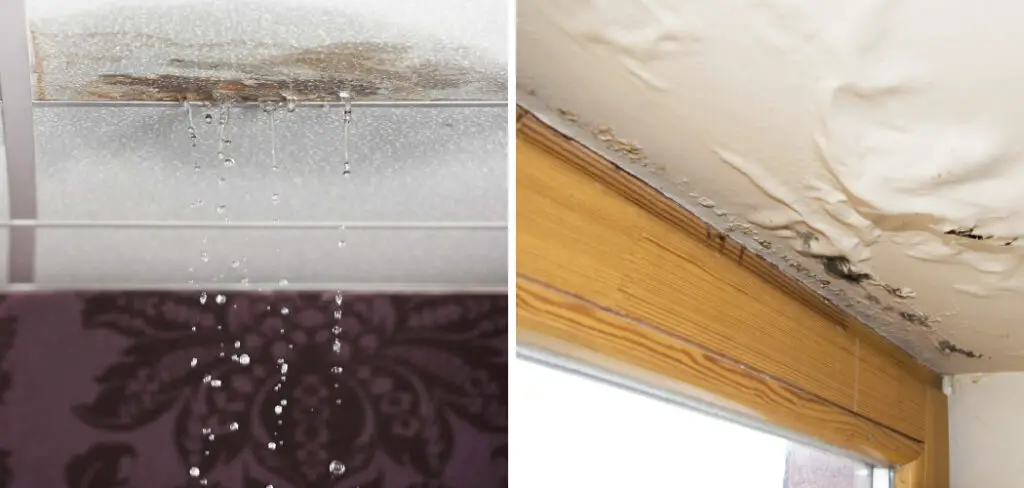
Water leaking through your basement ceiling is a common problem that can be caused by a variety of issues. Common causes include cracks or split in the foundation walls, improper drainage around the foundation, water build-up inside the basement due to poor ventilation, and faulty plumbing. If you have noticed water stains on your basement ceiling or floor, first inspect the ceiling or floor for any obvious signs of cracking or splitting. You can also inspect the foundation walls to check for cracks and weak points.
If you identify a crack in your foundation wall, the best way to fix it is by hiring a professional contractor who has experience dealing with concrete structures. For smaller cracks and splits, you may be able to seal them yourself with caulk or a concrete patch. However, you should always check with the manufacturer of the product to ensure that it is suitable for use on your foundation walls. If you can’t find an appropriate solution, then a professional contractor will be necessary.
Improper drainage around the foundation can cause water build-up in your basement and result in leaks. To prevent this, you should ensure that the soil surrounding your foundation is graded properly and that water is directed away from the house. If necessary, you can install a sump pump to remove any excess water from the area.
Finally, if you have identified faulty plumbing as a possible cause of your leak, you should contact a plumber immediately. A professional can identify any potential issues with your plumbing system and repair or replace broken pipes as needed. In some cases, it may be necessary to have a whole new plumbing system installed in order to ensure that it is functioning properly.
10 Methods How to Fix Leak in Basement Ceiling
1. Check the Source of the Leak.
The first step in fixing a leak in your basement ceiling is to determine the source of the leak. If the leak is coming from a pipe, you will need to repair or replace the pipe. If the leak is coming from a crack in the foundation, you will need to seal the crack. If the leak is coming from a window, you will need to repair or replace the window.
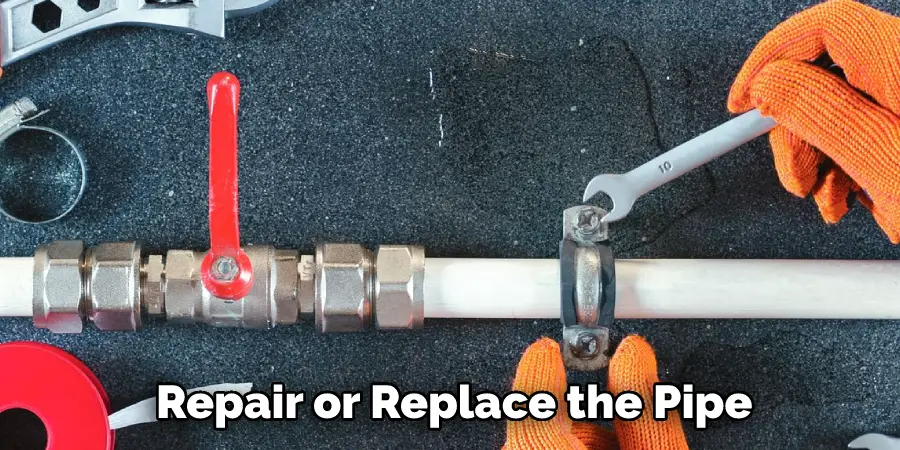
2. Turn off the Water Supply.
Once you have determined the source of the leak, you will need to turn off the water supply to the area. This will prevent further damage to your ceiling and will make it easier to make repairs. If you are unsure how to turn off the water supply, consult your local plumber or call a professional. Although it can be tempting to try and do the repair yourself, it is always best to leave this type of work to a qualified professional.
3. Remove Any Wet Materials.
Next, you will need to remove any wet materials from your basement ceiling. This includes any insulation, drywall, or other materials that have been soaked by the leak. It is important to remove these materials as soon as possible to prevent mold or mildew growth. To do this, you should use a crowbar or other tools to carefully lift out the materials. Be sure to wear protective gloves and safety glasses when handling these items, as they may contain harmful particles or debris. Once the wet materials are removed, dispose of them properly and clean up any remaining debris.
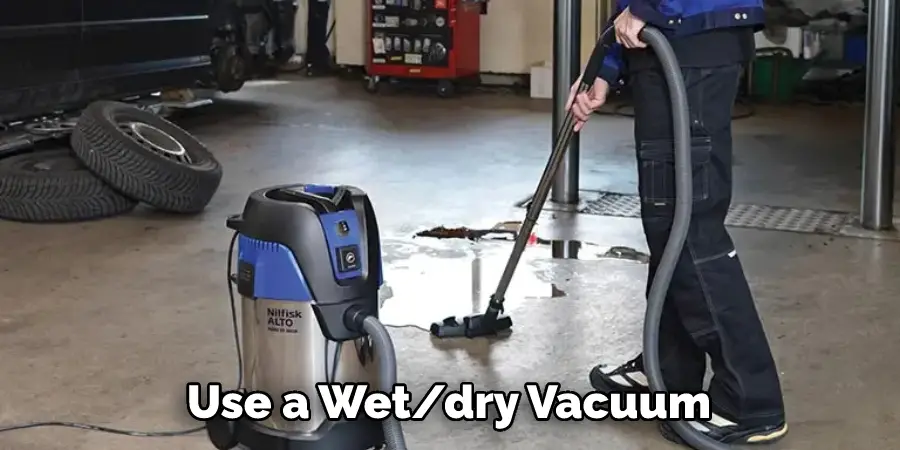
4. Dry Out the Area.
Once all of the wet materials have been removed, you will need to dry out the area completely. This can be done with a dehumidifier or by opening up windows and doors to allow air circulation. If you use a wet/dry vacuum to remove the water, be sure to clean up any remaining moisture. Once the area is dry, inspect for any signs of mold or mildew. If any is found, it should be removed with a fungicidal cleaner.
Follow the instructions on the product before applying. If necessary, you may need to use a fan or air mover to help speed up the drying process. Be sure to thoroughly dry out all of the affected materials before proceeding with the repair.
5. Inspect for Mold and Mildew.
After the area has dried out, you will need to inspect it for mold and mildew. Mold and mildew can cause serious health problems, so it is important to remove them as soon as possible. If there is any amount of mold or mildew, use a bleach-based cleaner to clean the area. Make sure to wear protective eyewear, clothing, and gloves when cleaning mold or mildew. Although bleach will kill the spores, it may not completely remove them. If extensive mold and mildew are present, you may need to call a professional for help.
6. Clean up Any Mold or Mildew.
If you find mold or mildew in your basement ceiling, you will need to clean it up immediately. You can use a commercial mold and mildew cleaner or a solution of bleach and water. Make sure to use the appropriate protective gear when cleaning up the mold. Once you’ve removed the surface residue, make sure to keep an eye on the area to make sure no new mold or mildew appears. Try to keep the area as dry and well-ventilated as possible.
7. Repair Any Damage Caused by the Leak.
Once you have cleaned up any mold or mildew, you will need to repair any damage caused by the leak. This may include replacing drywall, insulation, or other materials that were damaged by the water. You may need to call a professional for larger areas of damage, but if the area is small and you are comfortable doing repairs yourself, you can use joint compound and drywall tape to patch up any holes in the walls or ceilings. Once you have patched up the affected area, you can repaint the area to match the rest of your basement ceiling.
8 . Prime and Paint the Area.
After all of the repairs have been made, you will need to prime and paint the area where the leak occurred. This will help to protect your ceiling from future leaks. Make sure that you use water-resistant paint to ensure protection. Once this is done, your basement ceiling will be as good as new!
9. Check for Other Leaks.

Lastly, you will want to check the rest of your basement ceiling for other leaks. This will help to ensure that no further damage is caused by water entering your home. If you find any other leaks, be sure to patch them up as soon as possible. You can also use a damp-proofing treatment on your basement ceiling to prevent future water damage from occurring. Doing so will ensure that your basement remains dry and free from any potential problems caused by leaks in the future.
10. Hire a Professional as Necessary.
If you are unable to fix the leak yourself, then it is important to contact a professional contractor. A professional can identify any underlying problems, such as faulty plumbing or drainage issues, and make the necessary repairs. Additionally, if the leak is caused by structural damage to the ceiling, such as cracks or holes in the drywall, then a professional can help fix that as well.
If you are unsure of who to hire, make sure to check references and reviews before hiring a contractor. Doing so will ensure that you are hiring a reputable contractor who will be able to quickly identify and address the issue.
Will a Ceiling Leak Dry on Its Own?
In many cases, a ceiling leak will dry on its own if the source of the water is remedied. If there is a plumbing leak, for example, fixing the source of the leak will usually stop the water from coming in and allow it to dry on its own. However, there are some cases where a ceiling leak may not dry on its own, such as when there is a structural issue that needs to be addressed.
In these cases, it is important to call in an experienced professional to assess the damage and make sure that the issue is properly repaired. Additionally, if there are any signs of mold or mildew, it is important to address the issue immediately, as it can lead to health problems.

Conclusion
If your home has a leaking problem in the basement, don’t wait to take action. These problems will not go away on their own and will only get worse with time. Address the leak as soon as possible by following these simple steps on how to fix leak in basement ceiling. With a little bit of effort, you can prevent further damage to your home and save yourself a lot of money in the long run.