
Do you want to create a cozy relaxation spot in your home? Building a sauna in your basement is the perfect way to improve your physical and mental well-being. Saunas can help reduce stress, ease joint pain, and promote healthy sleeping habits. But they don’t have to be intimidating. It is important to know how to build a sauna in your basement.
It’s fairly easy to build one in your basement without needing professional assistance! In this blog post, we’ll give you all the details on how to do it. From selecting the right materials for building walls and floors, providing adequate ventilation systems, and finding space-saving seating solutions for multiple people—we’ve got it covered. Read on and learn everything you need to know about constructing a safe and efficient DIY sauna experience in your own home!
Tools You Will Need
Before you begin the build process, make sure that you have all the essential tools to get started. Some of the important equipment you will need includes
- A saw and drill for cutting
- A screwdriver set for assembling
- An electric heater and
- Thermostat
As well as various materials such as boards for building walls/floors and insulation.
Prepare the Basement
The first step in building a sauna in your basement is to make sure that the space is safe and suitable for use. Check if there are any water or moisture problems, as these can cause rot and mold. If necessary, get rid of any dust or debris that may be present.
Make sure to install insulation between the walls and floors to help reduce heat loss. Also, consider installing an exhaust fan in the room to draw out any moisture and promote proper ventilation.
6 Steps Guide on How to Build a Sauna in Your Basement
1. Measure the Space
Constructing a sauna in your basement can be a great way to turn an unused area into a peaceful and luxurious sanctuary. Before you get started, it’s important to measure the space available, so that you know exactly how much room you need for your sauna. This will also factor into deciding which type of sauna is best suited for the given area.
Such as wet vs. dry steam and any additional features like benches or partitions. Once you have established a budget and decided on the optimal dimensions, choosing all of the materials and equipment needed to complete your sauna should be easy sailing!
2. Select a Suitable Heater for Your Sauna
When selecting a heater for your sauna, you want to make sure that it is approved by Underwriters Laboratories (UL). This guarantees that the product has been tested for safety and meets all relevant standards. Furthermore, irrespective of whether you opt for an electric or gas-fired model.
You should verify whether it is compatible with your specific space and building codes. Installing the wrong unit can be hazardous and could create structural issues with your property. Always remember to read the manual thoroughly before attempting installation on your own, to prevent costly repair bills from any potential mishaps.
3. Purchase the Necessary Materials
If you’re looking for fun ways to spruce up your basement, building a sauna is worth considering. To get started, purchase the necessary materials for the walls and floors. Pre-made panels are great if you want a quick and easy build process, or you can use boards and insulation to construct from scratch.
Either way, with some elbow grease and the right materials, you can turn your basement into an at-home spa! Having a sauna in your home will bring comfort and relaxation for years to come.
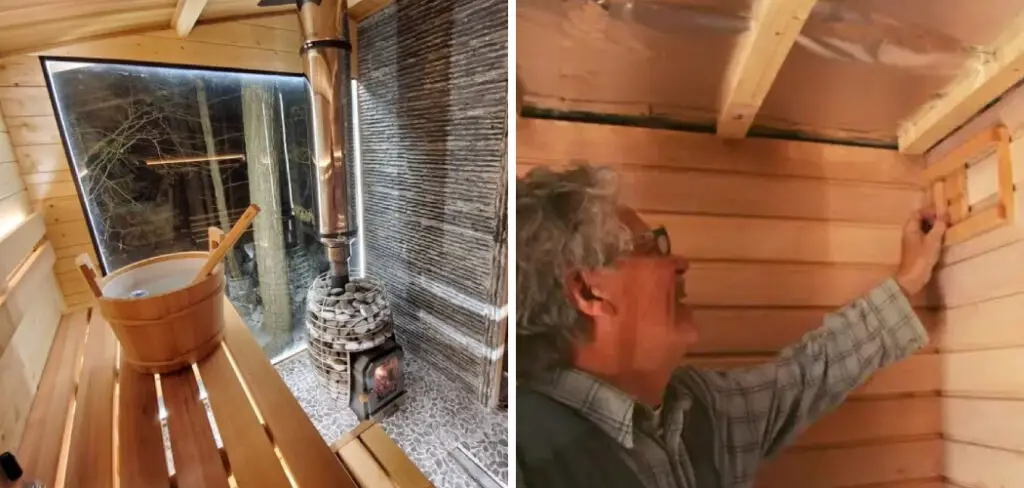
4. Install the Heater and Thermostat
Building a sauna in your basement is an exciting project that can provide relaxing and therapeutic benefits for years to come. To ensure your sauna setup runs smoothly, it’s important to install the heater and thermostat according to the manufacturer’s instructions.
This will help you maintain balanced temperatures for the best possible sauna experience, leaving you refreshed and ready for whatever comes next. Plus, following the manufacturer’s advice can save time and money by avoiding painful mistakes on this complex endeavor! Taking the time to read through installation guidelines now can pay off in better results once your build is complete.

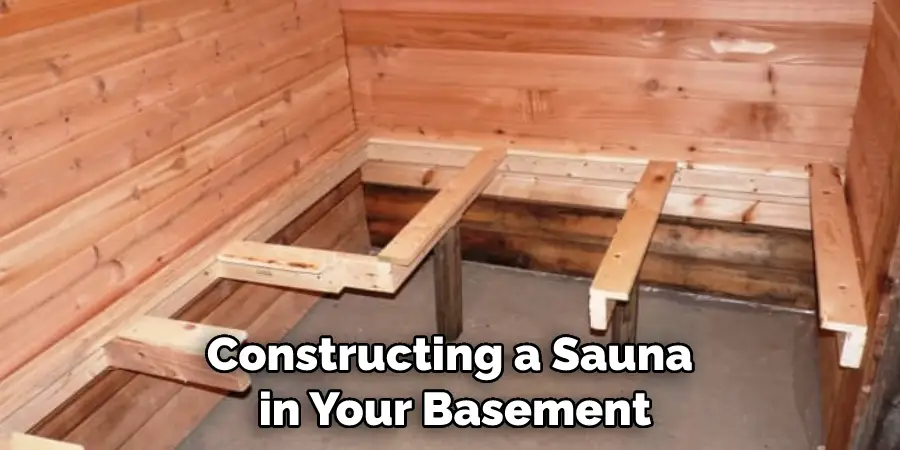
5. Build Out the Walls and Floor
Constructing the wall and floor of your sauna requires methodical attention to detail. When identifying the structure of your walls and floor, you need to consider the space, ventilation, materials, and room temperature. The best choice is to use tongue-and-groove boards varnished on both sides. However, using heat-treated wood planks is also an acceptable option that has fire safety benefits since these boards cannot catch fire easily.
It is essential to leave enough space between the panels for ventilation while building out the walls and floor so that it can allow air circulation within the sauna and make sure that it doesn’t get too hot when in use. Building a sauna in your basement by taking into account all these necessary components can be extremely rewarding and beneficial in several ways.
6. Add Seating, Such as Benches or Chairs
Creating a sauna in your basement is a great way to relax after a tough day. To make it even more inviting, consider adding some seating such as benches or chairs. This not only makes it more comfortable and inviting for multiple people, but also provides a convenient place to rest between sessions.
To complete the atmosphere, why not add a bucket of water with a ladle? This allows users to easily wet down their skin or throw cold water on hot rocks to create steam – an essential part of the sauna experience! With just these few additions, your homemade sauna will be ready for hours of peaceful tranquility and satisfaction.
Once you have completed these steps, your DIY sauna should be ready to use! Enjoy the relaxation and comfort of a home-built sauna without the expense of hiring a professional contractor. With proper ventilation and safety measures in place, you can enjoy all the benefits of a traditional sauna in your basement. Happy sweating!

Tips to Build a Sauna in Your Basement
- Decide on the size of your sauna. The size of your sauna will depend on the amount of space you have available in your basement. If you have a large basement, you may want to consider a larger sauna. However, if you have a small basement, you may want to consider a smaller sauna.
- Choose the type of sauna you want. There are two main types of saunas: infrared and traditional. Infrared saunas use infrared heaters to heat the air, while traditional saunas use rocks or wood stoves to heat the air.
- Choose the location for your sauna. The location of your sauna will depend on the size and type of sauna you choose. For example, if you choose a small infrared sauna, you may be able to put it in a closet or other small space. However, if you choose a large traditional sauna, you will need to find a larger space in your basement.
- Choose the materials for your sauna. The most common material for saunas is cedar, as it is durable and has natural insulation properties. Other popular materials for saunas include spruce and hemlock.
- Assemble the walls of your sauna. Once you have chosen the materials for your sauna, you will need to assemble the walls. If you are using cedar boards, you will need to nail them together using galvanized nails. If you are using spruce or hemlock boards, you will need to screw them together using stainless steel screws.
- Install the doors and windows of your sauna.
How to Design an Inviting, Comfortable Sauna With Seating?
Designing a sauna and seating area that is comfortable and inviting requires careful consideration of the features and materials you want to include. Begin by deciding the general layout of the room, considering the size, shape, and location of the seating, then highlight these elements with warm tones and textures.
Think about adding some carpet or floor mats for comfort underfoot, as well as some pillows or cushions on the benches for support. Incorporate natural materials such as cedarwood if you can to infuse the space with an inviting aroma. Additionally, install lighting fixtures that cast a soft glow while also allowing light in from outside. Simple touches can go a long way toward creating a cozy atmosphere. With thoughtful planning, you’ll be able to design an inviting and comfortable sauna experience for everyone.
How to Achieve the Perfect Steam Room Experience with Water Buckets and Ladles?
Don’t just settle for a typical sauna experience. Elevate your relaxation with a hot steam room, the perfect sanctuary to help improve your overall well-being.
To start on the right foot, make sure you have a few water buckets and ladles handy; these will be key in helping you create the ideal humidity level. Begin by pouring a bucket of cold water directly onto the hot rocks in the sauna, which will begin to rapidly release steam into the already warm environment.
Follow up with multiple ladlefuls of water throughout your session; this will keep your steam room humid while also keeping it free from excessive heat. With careful control of humidity and temperature, you’ll enjoy truly refreshing and revitalizing sessions with every visit!

Conclusion
A sauna in your basement is a great way to enjoy the relaxation and health benefits of a sauna without having to leave home. You should carefully determine how to build a sauna in your basement.
By following these simple guidelines, you can easily build your sauna in your basement and start reaping the rewards today. So what are you waiting for? Get started building your very own basement sauna today!